Mass Emails
A MASS EMAIL sends a targeted message to a targeted group and allows you to do that over and over again. It consists of an EMAIL HEADER, a MASS EMAIL LIST and an EMAIL MESSAGE.
Creating a Mass Email
- Click on the EMAILS tab in the gray menubar.
- Click on the CREATE MASS EMAIL button.
- Select what you want to do:
- I want to create a brand new email message
- I want to resend a previous email - no changes to the text
- I want to make a copy of a previous email and make some changes to the text
- I want to create a new distribution list for an email to be sent
- I want to create a new distribution, linking an existing email message with an existing distribution list, and setting the date and time to send
-
Enter a name for your mass email. Then select the correct entry in the field that asks who the email is from - this selection will be the email address that was approved when you set up your DonorPoint account. The information in the FROM NAME and FROM ADDRESS fields will be automatically filled in for you based on the email address you select. The REPLY-TO NAME and REPLY-TO ADDRESS fields can remain blank unless you want the Reply-To to be different from the From entries.
- Click on NEXT to continue.
-
Specify the MASS EMAIL LIST that you want to use. See Mass Email Lists for further information.
- Click on NEXT to continue.
-
SELECT or CREATE your EMAIL MESSAGE. You can select your message from a list of existing email messages or you can create a new message from scratch using the DESIGNER tool. See Email Message for further information.
- Indicate what you would like to do next:
- Send a single test email
- Schedule a date/time for your email to be sent
- Save and return to this mass email at a later time
- Save this mass email and edit the details
Send a test email
You can send a test copy of your email to check how it will look to the recipients and confirm that any links included in the email work as you intend them to.
Enter the email address where you want the test email to be sent. If you want to send the test to multiple email addresses, separate those addresses with a semicolon. Click SEND.
Schedule a date/time for your email to be sent
Use the calendar tool to select the date and time you want your email to be automatically sent.
After you have scheduled your email you will be able to review and edit additional details of your mass email.
Save and return to this mass email at a later time
Save and close your mass email.
Editing the details of the mass email
After you have scheduled your email you will be able to edit additional details of your mass email.
- Disable Unsubscribe - removes the UNSUBSCRIBE option from the emails you send
- Disable Opt-Outs and Bounce Exclusion - removes the Opt-Out option and the bounce exclusion from the emails you send
- Change the scheduled start time of your email
- Cancel the scheduled start time of your email
- Generate Test and Stress Test emails
Tracking the results of the mass email
Graphs and statistics on the opening screen show details of how many emails were sent, the number of Opens, Click-Throughs, Bounces, Opt-Outs, etc.
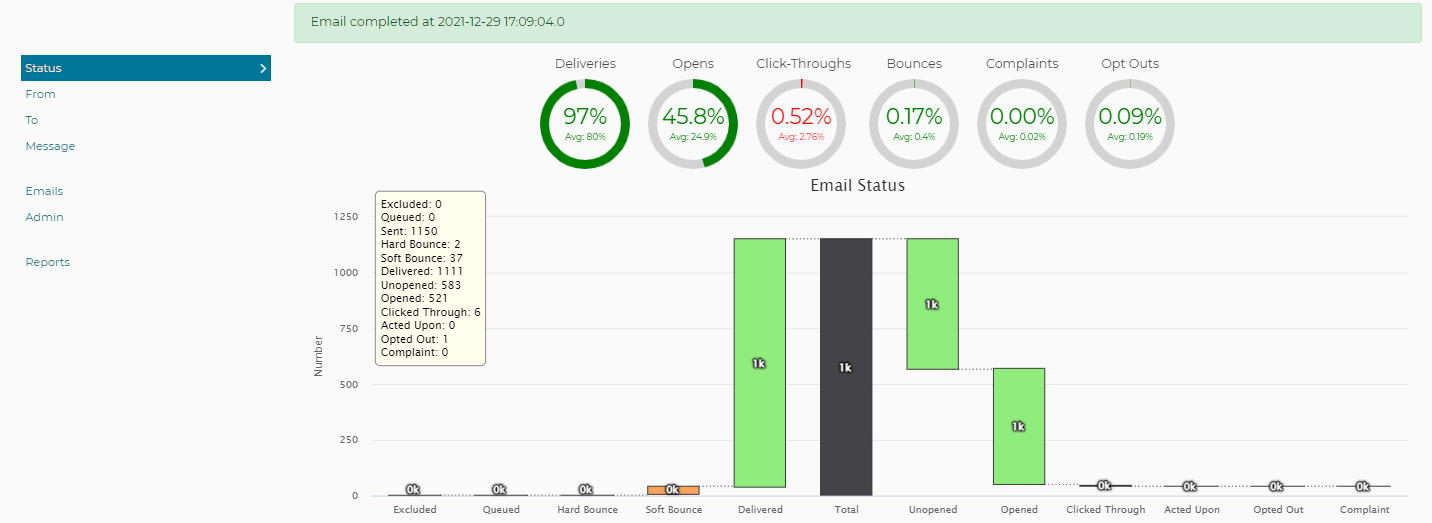
The TO tab in the left-side menubar will show a list of who received the email and the status of the emails that were sent by recipient.
Reports
REPORTS of this mass email can be found on the REPORTS tab in the left-side menubar. The reports in the system include summaries, bounce lists, opt-out lists, and response information.